This is an introduction to constructing battle navigation.
What I explain here is, how I construct in b-nav, and it is just "Kial's way", not the "proper way", "perfect way" nor something like that (well, could there be a "perfect way" of b-nav, anyhow? )
So, if you are seeking for your style (or a new style) in b-nav, this might be a bit of help, but if you feel comfortable with your style, don't change it unnecessarily.
--- 4 Kinds of Moves ---
There are roughly 4 kinds of moves, depending on the purposes.
You pick some of them and construct your movement every turn.
1. Escape
You must escape from their grappling as the top priority, and also from being shot.
So, place your escape moves first... it will save you from lagging out and being shot.
If you can't find out what to do in the next turn, just escape and take distance.
2. Positioning
What is a good position? That is... you are out of the reach of there shot, and they are in the reach of your shot.
So, the best place is like this... if they turns toward you, they come in the range of your shot, but if they show you their side, you are out of their shots range.
Taking their back is almost impossible at the beginning of the battle, let them come toward you.
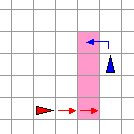
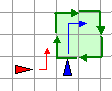
 (one move to forward will save you)
3. Wait
Most of the time, it's better to letting them come to you, as long as you are not in the corner or in a dead-ended inlet.
They will come to you, except the case they are trapped or running out of moves after being shot many times.
So stay in an open place, don't go into the narrow inlet chasing them.
4. Shoot
Shooting them is not the first priority... especially in the beginning.
While they have moves, 1 hit per 2 turns should be considerd as very good.
Keep escaping from them, and shoot where there is a possibility to hit.
When they got hit a few times and stopped moving, you can shoot them 3-4 times in a turn...at the final stage of the sea battle.
Usually, you use a combination of these moves in 1 turn (like "1-2-4", or "1-4-1"), but not always.
There can be a turn you just keep escaping, or even a turn you just wait and place no moves nor guns.
From my experience, trying to hit them every turn causes booch and ends with early-grappling.
--- LSM ---
LSM (Last Second Move) is useful, but don't use it every turn.
I've heard that if you do LSM twice in a row, brigands start using LSM, it seems true in most cases.
Place escape moves in the beggining of the turn, and add shots or make some changes later, that's what I do mostly.
LSM works in these special turns.
1. When you can hit them more than 3 times if they don't move
2. When you are going to grapple (the only case LSM can be used twice in a row)
3. When you need them to stay quiet to escape
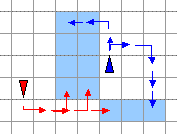
 (case 1 and 3)
Save LSM for these turns, and if you are lagging, you have to avoid using LSM of course.
Once they started using LSM, then predict asif they have all 4 moves.
== Saving Modes ==
Sometimes, you can't have enough moves or shots in the battle, like when you had to go with only one sailor, or with full bilge, or you might not able to find a good gunner.
Even when your vessel is filled with ult jobbers, they can lag out or booch, so, watch how fast you are getting move tokens and loaded cannons, and change the mode time by time.
1. no saving
2. save moves
You will have to wait for them more, and perhaps shoot more... with this mode, the span of your movement construction will be longer, like escape turn, waiting turn, and shooting turn.
Also you will need to shoot more whenever they would be near, so that you can make the score at least even.
3. save shots
When you don't have enough cannons loaded, you will need more move tokens, because instead of staying shooting twice, you will shoot once, and put an escape move.
4. save carp
This mode is kinda special, will be used when you have only 4 or less, or when want 2 of 5 people on sails.
You can make one battle without a carper, if you don't get more than 3 damage, and have a good bilger.
Though, you will need someone on carp after battle, so, this can be used only when you are wating for the last person to hop on, or have someone (maybe an alt), to hop around (the best multitask be gun and carp, depends on jobbers though).
Of course, you have to keep the damage minimum, so the battle will take longer.
== Winds and Whirls ==
Winds and whirls expand the possible moves and reaches.
So, basically, when they are in these, take distance and wait till they come out.
In contrast, when you do "shoot and escape", these are useful.
When you do potisioning, stay by those, and let them come forword to you.
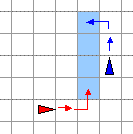
 (Be aware of winds)
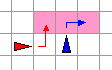
 (whirl can save you)
== "Kimagure" Strategy ==
Kimagure is a Japanese word meaning "whim" or "caprice".
Change your moves time by time. for example, when you can go either right or left, don't always go to right(left). And remember, they will do the same.
Their "patterns" are not always the same, so try to think of all possible moves.
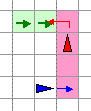
 (They can come eeither, you can go either too)